Creating an RPG API in Python Django (Part 3) - Experience Points and Properties

In our last post, we set up our initial serializers and views for our Character model. Today, we’ll start adding features to our Character model, focusing on setting up an experience point and leveling system.
If you’d like to follow along, you can find the complete source code from last week on GitHub. Clone down the repository and follow the setup instructions in the readme.
Most, if not almost all, RPGs have some sort of leveling or progression system. There are a plethora of leveling systems out there, but most try to create a feeling of progression. The amount of experience points you need to attain each next level increases while, often, the amount of experience points you gain from each encounter also increases as you face more difficult enemies.
In reality, the number of enemies you need to defeat to level may not increase significantly - this depends on the game and the objectives of the designers - but the numbers will most certainly increase. This gives you a feeling of accomplishment as you see not just the amount of damage you deal or your health increase over time, but the number of experience points and money you receive from battles increase.
We’ll spend some time looking at the math behind the system we’re going to design, considering its objectives along the way and designing our system to meet these objectives in a way that will satisfying to our fictional users!
RPG Math Fun
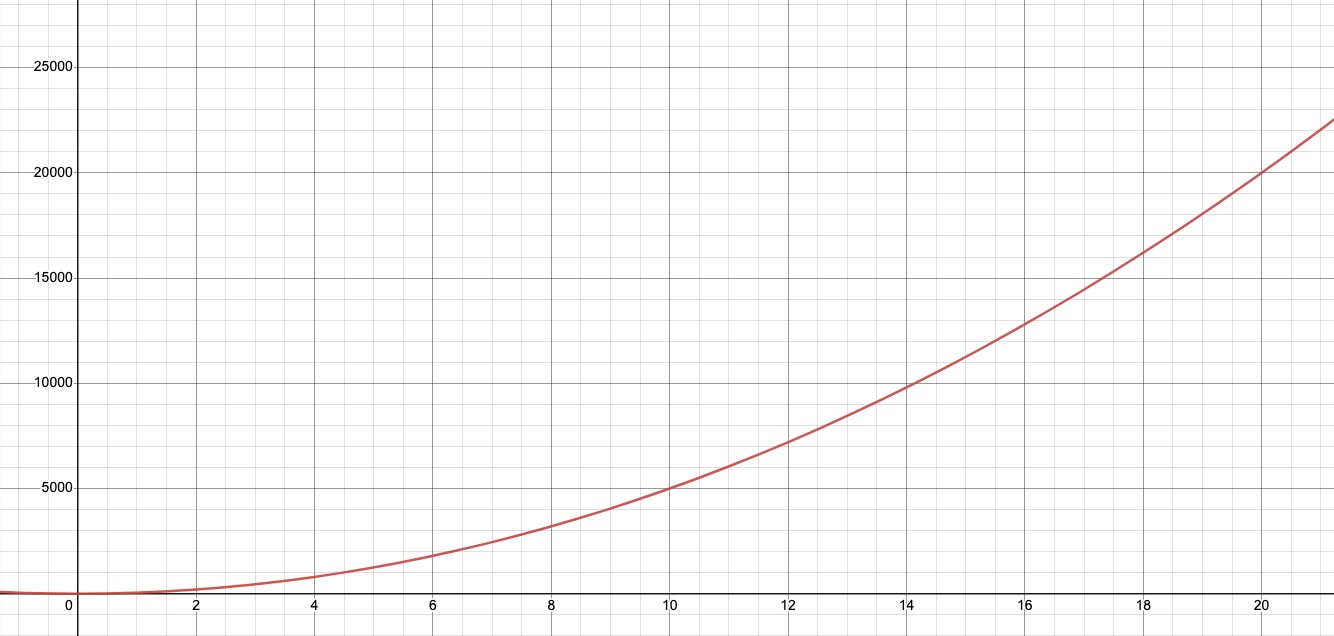
Before we can start any coding, we should discuss how we want our experience points system to work. For this project, I’ll be using an exponential growth system for both experience points and stats. If you imagine a graph with the x plane representing each level our character can reach and the y axis the amount of experience needed to reach that level, an exponential curve creates a gentle curve that slowly rises in the early levels and more rapid rises in later levels.
The formula we will be using the relatively simple, but has a couple of dials we can use to adjust it:
\[xp = baseXp * level^{exp}\]This equation solves for the experience points needed to reach level + 1 or the next level. Let’s plug in some values to get a better view of this:
Using a baseXp of 50 and an exponent of 2, we can see it will take 50 experience points to reach the next level. Now, if we’re level 2, how many experience points must we reach before we reach level 3? Let’s plug in the values and see:
Breaking Down Our Formula
The baseXp variable can be thought of as your foundation. It will raise the overall curve along the Y-axis by the amount specified, although it doesn’t change the basic shape of the curve. This value also exactly represents the amount of experience points our character will need to reach level 2 in our system. That’s a useful concept to keep in your mind, as you can understand the rest of the formula as determining how many “level 1s” your character will need to obtain to reach the next level.
The level variable represents the level we’re solving for. If we’re level 4 and want to know the number of experience points we’ll need to reach level 5, we can plug that into our equation: xp = 50 * 4**2.
The exp determines the shape of our curve. Let’s take a look at a graph of the first 20 levels using our formula above:
| Level | Next Level |
|---|---|
| 1 | 50 |
| 2 | 200 |
| 3 | 450 |
| 4 | 800 |
| 5 | 1250 |
| 6 | 1800 |
| 7 | 2450 |
| 8 | 3200 |
| 9 | 4050 |
| 10 | 5000 |
If you think of the baseXp variable as being a single unit - a “level one amount of experience” - you can see the exponential growth very clearly. For level 2, we need 1 “level one amount of experience.” For level 3 we need 4 “level one numbers of experience.” For level 4 we need 9. For level 5, we need 16 and so on.
You might notice when looking at the graph that when x is greater than zero and less than 1, we go from 0 to 50 on the Y-axis. If you think of zero to one as being the first cell of the graph, this pretty well represents what we want. It works a little like arrays in almost all programming languages. Our first cell - or the first array element - is at 0. However, this can be a little unintuitive for what we’re doing, since our first level is 1 and not 0. We can quickly correct this by subtracting 1 from our level and shifting the entire graph over so that when x = 1, y = 0.
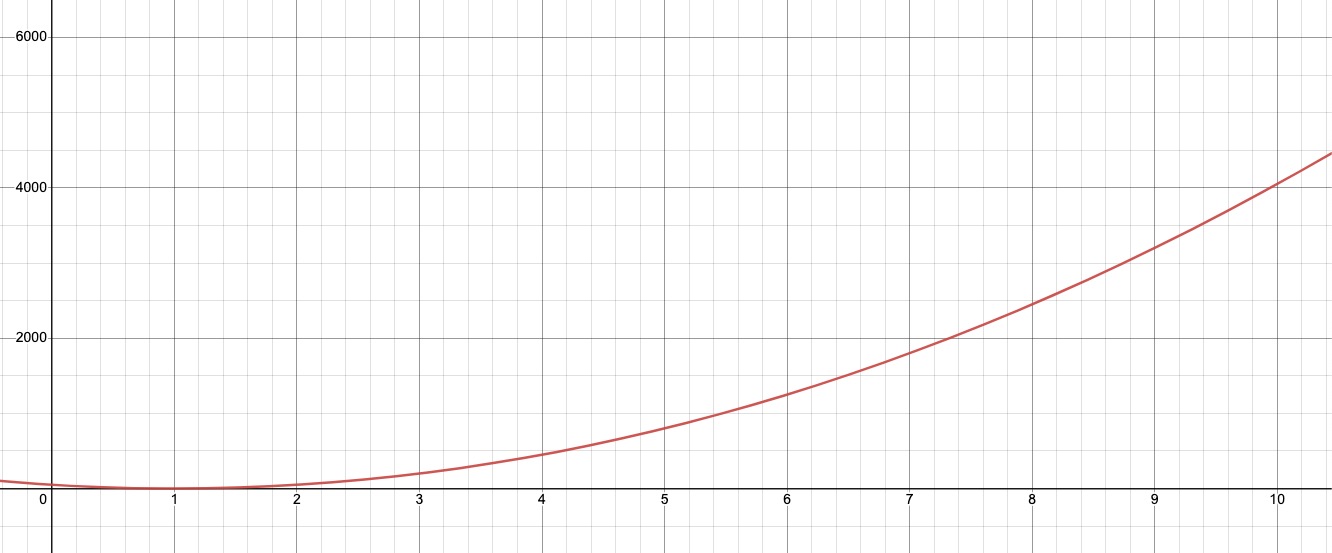 The graph has now been shifted to the right along the x-axis by 1
What’s in a Shape?
As we’ll discuss further in future posts, the specific shape of this curve is not particularly important, as long as it’s taken into account when deciding the amount of experience points enemies give. You determine the experience you want your player to have and tailor the numbers to match that experience.
Let’s say you want your players to face about 10 enemies to move from level 1 to level 2. Assuming they start with 0 experience points, they’ll need to gain 50 experience points to get to level 2. If we divide that needed experience by the number of enemies we want them to face, we come up with our early enemies having 5 experience points each.
For the transition from level 2 to 3, the number would go up significantly. To reach level 3, players will need 200 experience points. We’ve already designed our enemies to give 5 experience points a piece, and our player already has 50 experience points. So to reach level 3, they would need to defeat 30 enemies:
\[enemies = {200 - 50\over 5}\]This seems like a very large jump in the number of enemies needed to move up to another level. We can counteract this in a few ways. We could increase the amount of experience points the player receives from each enemy by having them face more difficult enemies. Or we could flatten our curve a little bit, making the jump from each level to the next less severe of a change. Ultimately, we’ll do a little of both in our project.
Our Formula
For the sake of our project, I’ll be using the formula with a very slight tweak:
\[xp = \bigl\lceil50 * (level - 1)^{1.6}\bigr\rceil\]Many of the older Final Fantasy games used a formula with an exponent of 1.5, but this seemed like a little too gentle of a slope, so I’ve increased it ever so slightly.
Also, once you stop using nice round exponents like 2, you’re going to run into a lot of decimals while doing this math. From this point out, we’ll be applying a ceiling or a floor to all values to ensure we’re getting whole numbers.
When we reverse this function to find the level from some number of experience points, we’ll need to reverse the ceiling operation to a floor.
Before we code this up, we do have one more thing to work out. We’ve written our equation that defines when each new level should be reached, but how do we determine the reverse? Given a particular experience points value, what level is our character currently? If - like myself - it’s been a while since you’ve cracked open an algebra textbook, just remember to move things around an equation, we just need to make sure to balance things by doing the inverse operation. To remove the baseXp from one side of the equation, we need to divide it out. If we do that on one side, we have to do it on the other side. In the end, we end up with the following:
Let’s use one of our example values from earlier to see how this works. We’ll be going back to a square root to make the numbers a little easier to work with.
\[level = \Biggl(\biggl\lfloor\sqrt{200\over 50}\biggr\rfloor\Biggr) + 1\]In this case, we want to know what level the character should be if they have 200 experience points. From our table above, we can see the answer should be level 3 (remember, we’re treating the experience points number listed as the amount of experience needed to reach the next level in the table). If we work through the math, we see that 200 / 50 = 4 and the sqrt(4) = 2, which when we apply the flooring function and add 1 makes it 3.
Updating Our Model
Now that we know what we’re trying to do, let’s get to it! We’re going to want to store experience points on our model, so let’s go ahead and add that as a field.
1
2
3
4
class Character(models.Model):
    name = models.CharField(max_length=255, null=False, blank=False)
    description = models.TextField(null=True, blank=True)
    experience_points = models.IntegerField(null=False, blank=False, default=0)
When adding new required fields, it’s helpful to add a default when possible. Django will prompt you when you go to create the migration if you haven’t provided one. Sometimes this can be difficult to come up with, but in this case, 0 is probably a pretty good default not just for facilitating our migration, but just as a sane default for what we would want set for a new character.
Now that we’ve made our change, let’s go ahead and create a migration and apply it to our database.
1
$ python manage.py makemigrations && python manage.py migrate
If you’re feeling confident, you can go ahead and string together your commands like this. If you’d rather take a look at the migration before applying it, run the first command, take a look at everything and then separately run the second command.
And that’s it! We’ve successfully updated our model. If you go ahead and run the application and view one of your API endpoints, you should see your characters listed with 0 experience points. If you go to the details view, you’ll see there’s even a new field in the HTML form you can use to update their experience values. This is the power of the DRY approach of both Django and the Django Rest Framework. All the groundwork we did in the previous posts is providing a solid foundation on which we can add additional fields and logic without having to go to multiple different places to update things. As our logic becomes more granular and we move away from the built-in functionality, the trade-off will be the loss of this centralization, but you get to opt into which features you have to granularly define as you go.
Let’s Level Up
Now that we have our experience points in place, we need to create a way to calculate and display our level. We’ll start with the simplest approach and optimize it as we go. Since we aren’t going to be directly setting the level for our characters - it will be calculated based on their experience points - the most straightforward way to approach this is to create it as a property.
Within the Character model, add a property called level and drop in the following code:
1
2
3
4
5
    @property
    def level(self) -> int:
        return math.floor(
            ((self.experience_points) / 50) ** (1 / 1.6)
        ) + 1
As you can see, we’ve recreated our formula from above in python within this property. An easy way of finding the nth root in Python is to raise the value to the 1 over nth power, or the inverse of the root you’re trying to find. You can imagine our formula being rewritten as:
\[level = \Biggl(\biggl\lfloor({xp\over 50})^{1/1.6}\biggr\rfloor\Biggr) + 1\]If you save your changes and reload your detail view, you’ll notice the value isn’t there. That’s because we’re told the serializers to load all fields and what we’ve just created is not a field but a property.
Python Properties
Properties in Python are not part of the state of the object, they’re computed at runtime. You might store the state in a field, and simply return it through the property - this is a pretty common way to make a field read-only or to strictly control the way the field can be updated - but the property itself is still dynamic.
It works the same way within the Django framework. Fields will be created as columns in the database. Properties, however, only exist within the Python object. You can access them via code, but they don’t map back to something within the database. Because they are not stored in the database, you cannot access them within many Django ORM functions like filter() or order(). These functions add clauses to a SQL query that is ultimately executed on the database. The database has no access to the dynamic properties that exist in your class, and therefore can’t use them in queries. This is a very important point to keep in mind when choosing to use properties within a Django model.
You can display a property within a model, but you can’t order by that property or filter by it. There are some more advanced workarounds you can use to create dynamic fields through annotations, but this is ultimately creating the field dynamically within the query - the way you might create a field using COUNT or some other function within SQL - and is not using the Python property.
Let’s walk through including the field within our API endpoint just to see how it’s done. However, we will pretty quickly be moving to another technique for storing our level.
Displaying a Property
Displaying a property requires us to update our serializer to include the property within the fields property. Open up the serializers.py file and make the following changes:
1
2
3
4
5
6
7
8
9
10
class CharacterSerializer(serializers.ModelSerializer):
    class Meta:
        model = Character
        fields = [
            'id',
            'name',
            'description',
            'experience_points',
            'level'
        ]
If you reload your character detail view now, you should see the computed level field showing up in the results. You will not, however, see it in the update form at the bottom of the page. The property cannot be written back to, which makes sense since it doesn’t actually exist in the database. If you never need to filter by a particular value, and calculating the value is an inexpensive operation, properties can be extremely useful tools in your Django tool belt. However, we’re going to take a slightly different approach to the problem and create a data field for our level attribute and prevent our users from being able to update it.
Level Up Our Level Field
Let’s assume that we do want to be able to filter and order by our level field. We currently can’t do this because the field isn’t stored anywhere in the database, so we’re going to need to find a way to store it in the database but still ensure it’s not set by our public API. There are several ways we could accomplish this, but I’d like to consider two related methods.
For either approach to work, we’re going to need to create a level field in our field list. Let’s go ahead and add the field, but hold off on creating and applying the migration until we’ve discussed and settled on how we will use the field. This will prevent you from potentially having to create yet another migration in a few minutes!
1
2
3
4
5
class Character(models.Model):
    name = models.CharField(max_length=255, null=False, blank=False)
    description = models.TextField(null=True, blank=True)
    experience_points = models.IntegerField(null=False, blank=False, default=0)
    level = models.IntegerField(null=False, blank=False, default=1)
Like with our experience points field, having a logical default is a good idea. In this case, defaulting to level 1 seems to make the most sense. We also need to remove our level property, but let’s not delete the logic we’ve created. Remove the @property decorator and rename the function to something like get_level_from_xp.
1
2
3
4
    def get_level_from_xp(self, xp: int) -> int:
        return math.floor(
            (self.experience_points / 50) ** (1 / 1.6)
        ) + 1
Separate Read/Write Serializers
One approach would be to create separate read and write serializers. We would use one serializer for retrieve and list views and another for create and delete views. The retrieve and list views would contain the level field, but it would be left out of the create and update views.
There are a couple of potential issues with this approach. First, we now have to maintain two separate serializers for the same model. If we begin to introduce more complex logic into our serializer down the road, this will mean repeating ourselves when we make updates, which is always something we try to avoid.
Also, Django Rest Framework follows a very common practice of using the same API endpoint for multiple actions and just using different verbs - defined by the HTTP method used - to determine what action should be taken. This is our current URL table for our API:
| Action | HTTP Method | URL |
|---|---|---|
| List | GET | /api/v1/characters |
| Create | POST | /api/v1/characters |
| Retrieve | GET | /api/v1/characters/<id> |
| Update | PUT | /api/v1/characters/<id> |
| Delete | DELETE | /api/v1/characters/<id> |
If we recall our post last week, each of our URLs is being routed to a single view, which is handling the various types of requests. Each view is bound to a particular serializer. This means if we want to use separate read and write serializers, we’re going to need more views. Let’s imagine we created two new serializers, CharacterReadSerializer and CharacterWriteSerializer. To split up the views, we’d end up with the following URL table:
| Action | HTTP Method | Serializer | URL |
|---|---|---|---|
| List | GET | CharacterReadSerializer | /api/v1/characters |
| Create | POST | CharacterWriteSerializer | /api/v1/characters/create |
| Retrieve | GET | CharacterReadSerializer | /api/v1/characters/<id> |
| Update | PUT | CharacterReadSerializer | /api/v1/characters/<id>/update |
| Delete | DELETE | CharacterReadSerializer* | /api/v1/characters/<id>/delete |
There’s nothing wrong with the URL structure above. It’s fairly common to see the “create/update/delete” verbs in API endpoints and to have those endpoints separate from one another. However, in our case, that design pattern will cause us to have to maintain more code and we will end up repeating ourselves quite a lot to maintain all those separate endpoints. So let’s consider another much more simple approach that utilizes a built-in Django feature on model fields and leverages the fact that our users are interacting with our model through our public API, and not directly with the model code itself.
Let Django Do the Work
One feature we can leverage here is the editable attribute on Django fields. When you set editable to False, Django will prevent the field from being added to Django-generated forms, per Django’s documentation. Let’s have a look for ourselves at what that means when it comes to Django Rest Framework and our code specifically. Add editable=False to the attributes of the level field.
1
2
3
4
5
class Character(models.Model):
    name = models.CharField(max_length=255, null=False, blank=False)
    description = models.TextField(null=True, blank=True)
    experience_points = models.IntegerField(null=False, blank=False, default=0)
    level = models.IntegerField(null=False, blank=False, default=1, editable=False)
Go ahead and create a migration and migrate the change to your database: python manage.py makemigrations && python manage.py migrate. We should be able to run our project now and see the level field listed in our read views, e.g. /api/v1/characters/ and /api/v1/character/<id>. However, you’ll notice the field is still not in the HTML form at the bottom of the detail view. So it seems that things are working as expected so far!
However, if you take a look at one of your records and the experience points are higher than 50, you’ll notice the experience points and level don’t match. Remember, we set the default value to 1, and nowhere in our code are we setting the level based on the experience points the character has. We’re going to correct this right now by overriding the save() function on our model.
Overriding Model Methods
There are a number of methods you can override that are implemented on the parent models.Model class we’re inheriting from. One of the most useful of these is the save function. We can use this to intercept values being saved to our database and calculate dynamic fields prior to the save method being called. We already have a function for calculating the level based on the experience points of the character, so we just need to set the level using that function prior to the save occurring.
1
2
3
    def save(self, *args, **kwargs):
        self.level = self.get_level_from_xp(self.experience_points)
        super().save(*args, **kwargs)
When this function is called self.experience_points will represent the validated value that the experience_points field is currently set to, but may not represent what is in the database. In other words, it’s the “update” value that’s about to be sent to the database. So we can pass this value to our get_level_from_xp function and set the level field directly. We then call the parent class’s save method using the super() function.
If you’re not familiar with concepts of inheritance or parent classes, it’s worth a quick review as Django - and specifically the way I use Django - tends to be very dependent on class-based views and inheritance. For the time being, however, all you need to know is that the models.Model class has a function in it called save(). Up until now, that save() function from the parent class has been called every time we’ve saved a record. However, now that we’re overriding the parent’s save() method to insert our own logic, we need to make sure we called the parent’s save() method from within our own to make sure all the logic in that parent method gets executed. This saves us (no pun intended) from having to recreate all the logic in the parent class in our child class.
At this point, we should be able to reopen our project and start playing with different experience points values and see our level increase or decrease accordingly. You can even check to ensure the level can’t be overwritten by an API call. Open Insomnia or Postman and make a PUT request to /api/v1/characters/1/ (or whatever ID exists within your database) and send the following:
1
2
3
4
{
  "experience_points": 50,
  "level": 99
}
With 50 experience points, our character should be at level 2. However, we’re attempting to force the level to be set to 99. If you submit the request, however, you’ll see that the level gets set to 2 as expected. This is because while the level field might be 99 when the save() function is called, we’re immediately calculating and setting it in the first line of our save() function, overwriting whatever value was sent to us.
While this method isn’t fool-proof - it’s still possible to set the level to whatever we want from within the Django code itself, and it will not update until the save() method is called - since our interactions with the model will almost always be through the API endpoints, this is a pretty simple and effective way of creating a field with a dynamically set value.
Let’s Clamp Down on Things
Currently, our leveling system would allow a player to level up infinitely, or at least until our experience points reached a number too large to be stored in our database. We likely want to end our leveling at some known constant, so we’ll need to account for that within our code. The easiest way to do this is to limit our level between a minimum and a maximum. We know that we don’t want our characters to have a negative or zero level, so the minimum is 1. Most games have a maximum level of 99, so I think we’ll continue that tradition here.
A clamp function usually looks something like this:
1
2
3
4
5
6
7
def clamp(value: int, min_val: int, max_val: int) -> int:
    if value <= min_val:
      return min_val
    if value >= max_val:
      return max_val

    return value
It’s common to see Python developers spring for a one-liner here, usually with the argument that it will be more performant. A common clamping technique is to use a combination of the min and max functions to clamp a value. I used this technique pretty often for clamping in the past until one day I decided to test the performance difference for myself. We’ll cover benchmarking in a future post, but I’ve gone ahead and set up a benchmark using the rich-bench library and created the following test:
1
2
3
4
5
6
7
8
9
10
11
12
13
14
15
16
17
18
19
20
21
22
23
24
25
def clamp_naive(value: int, min_val: int, max_val: int) -> int:
    if value <= min_val:
        return min_val
    if value >= max_val:
        return max_val

    return value

def clamp_min_max(value: int, min_val: int, max_val: int) -> int:
    return max(min_val, min(value, max_val))

def clamp_values_naive():
    """Clamps values using naive approach"""
    for val in range(-50_000, 50_000):
        clamp_naive(val, 1, 99)

def clamp_values_min_max():
    """Clamps values using min_max approach"""
    for val in range(-50_000, 50_000):
        clamp_min_max(val, 1, 99)

__benchmarks__ = [
    (clamp_values_naive, clamp_values_min_max, "Clamping by min_max instead of naive function"),
    (clamp_values_min_max, clamp_values_naive, "Clamping by naive function instead of min_max")
]
We get the following results from this benchmark:
| Benchmark | Min | Max | Mean | Min (+) | Max (+) | Mean (+) |
|---|---|---|---|---|---|---|
| Clamping by min_max instead of naive function | 0.062 | 0.065 | 0.063 | 0.222 (-3.6x) | 0.256 (-3.9x) | 0.241 (-3.8x) |
| Clamping by naive function instead of min_max | 0.208 | 0.222 | 0.215 | 0.061 (3.4x) | 0.062 (3.6x) | 0.062 (3.5x) |
I chose to loop over a range of values to test to remove the need to generate a random number or to have to pre-generate a list of numbers to test. Since both functions loop over the same range of numbers, we’re able to compare apples to apples. Look at the results, there is over a 3x difference in performance between the “naive” approach and the one-liner. In this particular case, going with the more readable approach is also going to grant us better performance.
Where you put your utility classes is up to you, but I tend to keep them in a utils.py file, either in the root module of my project - in this case, that would be the rpgapi/ directory - or in the module that is specifically using the utility class. Since we’re likely only going to be using a single module in this project, I’ll go ahead and create the file under the characters/ module.
1
2
3
4
5
6
7
8
9
10
11
12
13
14
def clamp(value: int, min_val: int, max_val: int) -> int:
    """
    Clamps the value between the provided minimum and maximum.

    :param value: The value to clamp
    :param min_val: The minimum value to allow
    :param max_val: The maximum value to allow
    :return: Returns the value clamped between the minimum and maximum
    """
    if value <= min_val:
        return min_val
    if value >= max_val:
        return max_val
    return value
We can now import our function and use it in our get_level_from_xp function to clamp the value.
1
2
3
4
5
6
7
8
9
from .utils import clamp

...

    def get_level_from_xp(self, xp: int) -> int:
        level = math.floor(
            (self.experience_points / 50) ** (1 / 1.6)
        ) + 1
        return clamp(level, 1, 99)
Final Thoughts
In spite of Django being a relatively opinionated framework that works best when used as intended, it does have a remarkable amount of flexibility to it when you begin to understand how things are working under the hood. We were able to leverage the editable and save() overwriting features of Django to create a “read-only” field that is dynamically set. While our solution isn’t perfect, it solves the problem in a fairly acceptable way and has the benefit of allowing us to now be able to sort and filter our records using our level field.
Now that we’ve added some complexity to our model, it’s probably about time we started to talk about writing tests for Django. We’ll expand upon our model by adding additional character stats that leverage our level field and use Django’s built-in testing framework to validate that our code is working as expected.