Creating an RPG API in Python Django (Part 2) - Serializers and Views

In our last post, we stepped through the initial setup process for building an RPG using Django and Django Rest Framework. Today, we will be creating a serializer for our Character model and creating our initial API endpoints.
If you’d like to follow along, you can find the complete source code from last week on GitHub. Clone down the repository and follow the setup instructions in the readme.
Serializers
Within Django Rest Framework, the work of converting requests and responses from JSON to Python objects - and in particular to our model classes - is done by serializers. They act as a translation layer between your API endpoints and your models. This allows you to format request and response schemas into formats that are convenient for consumers of your API while allowing you to control the data that is ultimately submitted to your database.
To get started, we first need to add Django Rest Framework to the list of installed apps in our settings.py file. I tend to order my apps by first including Django modules, then “vendor” modules followed by my own custom modules.
1
2
3
4
5
6
7
8
9
10
INSTALLED_APPS = [
      'django.contrib.admin',
    'django.contrib.auth',
    'django.contrib.contenttypes',
    'django.contrib.sessions',
    'django.contrib.messages',
    'django.contrib.staticfiles',
    'rest_framework',
    'characters'
]
Once added, we will have access to a series of tools we will use to implement the API endpoints, the first being serializers. Since we will be starting by creating a serializer class for the Character model, let’s create a file named serializers.py in the characters directory and add the following imports:
1
2
3
from rest_framework import serializers

from .models import Character
For this first example, we will be using the ModelSerializer. In most cases, if you’re using a one-to-one mapping between request/response fields and the model, this is going to be your best bet. To configure the serializer, we need to provide some metadata, including the model we’re serializer and the fields we want to be serialized by the serializer.
1
2
3
4
class CharacterSerializer(serializers.ModelSerializer):
    class Meta:
        model = Character
        fields = '__all__'
The __all__ keyword specifies that we want all the fields included in our serializer. Had we only wanted our name and description fields, we could have provided them as an array: fields = ['name', 'description']. To test out our serializer, we can open the Django shell and import it in. Here’s an example of how things might look:
1
2
3
4
5
6
7
8
9
10
>>> from characters.models import Character
>>> from characters.serializers import CharacterSerializer
>>> person = Character.objects.first() # A single person object is returned
>>> s_person = CharacterSerializer(person)
>>> s_person.data
{'id': 1, 'name': 'Bilbo', 'description': 'A hobbit'}
>>> people = Character.objects.all() # A QuerySet object is returned
>>> s_people = CharacterSerializer(people, many=True)
>>> s_people.data
[OrderedDict([('id', 1), ('name', 'Bilbo'), ('description', 'A hobbit')])]
You can see from the previous example, a serializer by default is used to represent a single object. However, it can also represent a collection if the many option is set to True. In addition, the serializer will turn the data object into a dictionary which can be accessed via the data property. In the case of collection, this will be an OrderedDict. This is important because it maintains the ordering of the records you pass in via your QuerySet or list.
Creating Our First View
We can now serialize single or multiple characters, which means we can create at least 2 views right now: a “list” view for seeing all the characters within our data set, and a “detail” view for viewing the details of a single record. We’ll begin by creating the views within the characters/views.py file.
1
2
3
4
5
6
7
8
from rest_framework import generics
from .models import Character
from .serializers import CharacterSerializer

# Create your views here.
class CharacterListView(generics.ListAPIView):
    queryset = Character.objects.all()
    serializer_class = CharacterSerializer
This adds a generic ListAPIView for our characters. This is a read-only view that will return a collection - specifically whatever the queryset parameter is set to - and serialize that collection using the serializer_class specified. In this case, we will be returning all characters, and serializing them using the CharacterSerializer class. There’s one last step before we can view the output of our view: we must add the API path to our URL configuration.
Modifying Our URLs
Currently, the URL configuration for our project is stored in the urls.py file in the main module. We could add all of our endpoints here, but I prefer to separate that configuration into each submodule for future inspection and modification. To accomplish this, we’ll add a single base URL to the main urls.py file, and “include” other URLs from our submodule. It should look something like this:
1
2
3
4
5
6
7
8
9
10
11
12
13
14
15
16
17
18
19
20
21
22
23
24
"""
URL configuration for rpgapi project.

The `urlpatterns` list routes URLs to views. For more information please see:
    https://docs.djangoproject.com/en/4.2/topics/http/urls/
Examples:
Function views
    1. Add an import:  from my_app import views
    2. Add a URL to urlpatterns:  path('', views.home, name='home')
Class-based views
    1. Add an import:  from other_app.views import Home
    2. Add a URL to urlpatterns:  path('', Home.as_view(), name='home')
Including another URLconf
    1. Import the include() function: from django.urls import include, path
    2. Add a URL to urlpatterns:  path('blog/', include('blog.urls'))
"""
from django.contrib import admin
from django.urls import path, include

import characters

urlpatterns = [
    path('api/v1/characters/', include('characters.urls')),
    path('admin/', admin.site.urls),
I’ve left the boilerplate documentation at the top because it is very useful as a guide and reference when adding future URLs. We’ve added a new path to the URL patterns, which says any requests for api/v1/characters/ - or any path under that URL - should be looked for in the characters.urls module. We haven’t created that file yet, so let’s go ahead and do that.
1
2
3
4
5
6
7
8
9
10
from django.urls import path

from .views import CharacterListView

urlpatterns = [
    path(r'',
        CharacterListView.as_view(),
        name='api.characters.list'
    )
]
The important part to note in the file above is the variable we’re adding our paths to must be named urlpatterns. The include function specifically looks for this variable name and adds the patterns to the primary urlpatterns object from the main urls.py file. In this case, we want our list view to be at the root of this endpoint, so api/v1/characters/ so our pattern is just empty. We want this path to use the CharacterListView we just created, and since it is a class and not a function, we use the handy as_view() function to tell Django Rest Framework which function to send the request to (this gets done automatically by our generic view class). We then give our endpoint a name, in this case, api.characters.list. This name can be whatever you want, but I highly recommend coming up with a logical pattern and sticking to it for your sanity. This name can be used to “resolve” the URL using functions like reverse and reverse_lazy. With these functions, you can provide the view name and whatever variables are necessary to construct the rest of the URL (you’ll see an example of this below when we create a detail view) and it will return the URL.
At this point, you should be able to start the dev server - python manage.py runserver - and browse to your endpoint: http://127.0.0.1:8000/api/v1/characters/. If you have any characters in your database, you should see results returned in JSON within a nice HTML wrapper that allows you to explore your API within the browser. If you make the request from a tool like Insomnia or Postman the response will be in JSON by default.
Requests sent from Insomnia and Postman are in JSON because the requests are sent with the
Content-typeofapplication/jsoninstead oftext/html. Most javascript libraries also have the a similar default behavior, but not all. It’s important to note that it’s the content-type header that’s triggering this difference in response.
Creating our Detail View
Adding our detail view is going to be very similar to creating our list view with one new wrinkle: we’ll be defining a variable portion of the URL when creating the path and we’ll need to tell the view what the name of that variable is so it can lookup the record.
Let’s start by creating the view. Directly under the CharacterListView class, let’s create our CharacterDetailView:
1
2
3
4
class CharacterDetailView(generics.RetrieveAPIView):
    queryset = Character.objects.all()
    lookup_field = 'id'
    serializer_class = CharacterSerializer
In this instance, we’ll be using the generic RetrieveAPIView as our base class, and adding the additionally required field lookup_id. The RetrieveAPIView is a read-only view for a single object. We provide it a base queryset - in this case, all the Character records - and then a lookup_field which will pass a field of that same name from the URL back to the database in a WHERE clause. In terms of the underlying Django code that runs, you can imagine the view retrieving its record in the following way:
1
return Character.objects.all().get(id=id)
This should look familiar to anyone who has used Django in the past, but it’s worth reviewing as we’ll be using the ORM features throughout the project. The Character model provides an abstract entry point for working with Character records. The “manager” of that model - or in other words, the interface we can use to interact with existing records - is stored in the objects field. This manager has functions we can use to interact with the underlying data, but the two we will be using the most are the all() function, the filter() function and the get() function.
The Django ORM
The all() function does exactly what it sounds like - it retrieves all the records from the database. You can imagine this function call spitting out your typical SELECT * FROM TABLE SQL query. There is no WHERE clause added when using all(). The all() function will always return a collection of records, even if it’s a collection of one or zero.
The filter() function is the primary way we add WHERE clauses to our queries. It works by adding keyword arguments (kwargs) to the function, which are translated into WHERE clauses and attached to the query. Consider the following example:
1
people = Character.objects.filter(name='Bilbo')
This would roughly translate to the following SQL:
1
2
3
4
5
6
SELECT
  *
FROM
  characters_character
WHERE
  character_character.name = 'Bilbo';
There are a number of special filters you can use when filtering that allow you to do more precise filters. Let’s say, you want to use a LIKE comparison in your query, and you want it to be case-insensitive. You could do the following:
1
people = Character.objects.filter(name__icontains='Bil')
This would roughly translate to the following in MySQL:
1
2
3
4
5
6
SELECT
  *
FROM
  character_characters
WHERE
  character_characters.name ILIKE '%Bil%';
You could also use name__istartswith or name__iendswith or their case-sensitive equivalents: name__contains, name__startswith or name__endswith.
The filter() function will always return a collection, even if that collection is of one or zero objects.
The get() function looks for a specific record. It will always return a single record unless the record cannot be found. In that case, it will throw an exception. Let’s consider the following:
1
person = Character.objects.get(name="bilbo")
We might assume, based on the example data I’ve been using, that this would return us our single record with the ID of 1, which has the name “Bilbo”. However, this lookup is case-sensitive, so this would throw the Character.DoesNotExist exception. It is usually best practice to avoid mutable string lookups when using the get() function and instead use immutable fields, like the primary key of the record. Because looking up a record that doesn’t exist can result in an uncaught exception - thereby crashing your application mid-request potentially - it’s common for developers to wrap these lookups in a try/catch and handle the exception when it’s thrown:
1
2
3
4
5
6
7
8
9
from rest_framework.response import Response

try:
    character = Character.objects.get(id=lookup_id)
except Character.DoesNotExist as e:
    return Response({
      "message": f"A character with the id {lookup_id} does not exist."
      "status": 404
    }, status=404)
Back to our View
The RetrieveAPIView is going to use the lookup_field to fetch the record using the get() function under the hood. Luckily for us, it handles any sort of failure to find a record by throwing a 404 by default if the record can’t be found. With all this knowledge in hand, let’s add a path to our characters/urls.py file and check out our new endpoint.
Again, we have to remember the path is relative to the base path of the module - in this case api/v1/characters/ - so we only need to add the part of the path that’s additional to that base. We will also need to add the new view to our imports at the top of the file.
1
2
3
4
5
6
7
8
9
10
11
12
13
14
15
from django.urls import path

from .views import CharacterListView, CharacterDetailView

urlpatterns = [
    path(r'',
        CharacterListView.as_view(),
        name='api.characters.list'
    ),
    path(r'<id>/',
         CharacterDetailView.as_view(),
         name='api.characters.detail'
      ),
]
With that added, you should be able to browse to http://127.0.0.1:8000/api/v1/characters/1/ and see the record within your database with the ID of 1. Since we’re using the same serializer - and our model and serializers are extremely simple at this point - this will look almost exactly the same as the list view. There should only be a single record, and you’ll note it’s not part of an array - it’s not wrapped in square brackets [].
You’ll notice in the new path that we have a new bit of syntax: angle brackets around our lookup variable: <id>. This indicates to Django that this portion of the URL is dynamic and should be passed to the view as a variable. In this case, we’re passing the variable id back to our view with whatever value is provided here. You can pass any value to this portion of the URL, but Django will figure out what type is needs to be cast to and automatically take care of this for you. In the case of an ID, it needs to be cast to an integer before being passed to the database, so passing in something like api/v1/characters/asdf/ will result in a 404 Not Found.
Let’s Write Some Data
We can very quickly and easily modify our views to be writable. We’ll start by adding a Create view. Since we’re using generic views already, this can be quickly accomplished by modifying the class our ListView derives from. Let’s update it from ListAPIView to a ListCreateAPIView.
1
2
3
class CharacterListView(generics.ListCreateAPIView):
    queryset = Character.objects.all()
    serializer_class = CharacterSerializer
If you now browse to the list view, you will see Django Rest Framework has added a nice HTML form onto the page for us to use. You can use this to add new records to your collection for testing purposes, or try plugging in the “Raw Data” into Postman or Insomnia. We’re reusing the same endpoint - api/v1/characters/ - but create requests will use the POST method instead of the GET method.
Let’s go ahead and modify our Detail view to also allow for updates to records. This will be a very similar process, simply replacing the parent class from RetrieveAPIView to RetrieveUpdateAPIView.
1
2
3
4
class CharacterDetailView(generics.RetrieveUpdateAPIView):
    queryset = Character.objects.all()
    lookup_field = 'id'
    serializer_class = CharacterSerializer
If you now browse to one of your records - api/v1/characters/1/ - you will see the HTML form on the page again. You can update the info in it and click on the “PUT” button below. This should clue you in on the type of request that is used to update records!
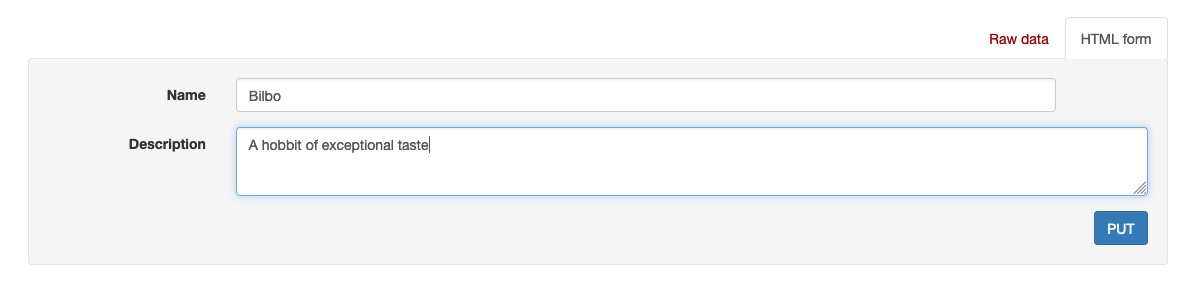
After clicking “PUT” you should see the record updated above, confirming the changes made.
To try this out from Insomnia or Postman, use the “Raw Data” JSON as a template, and then submit the request as a PUT request to api/v1/characters/<id>/ making sure to provide the ID of the record you’re updating.
We can take this one step further by updating our detail view from a RetrieveUpdateAPIView to a RetrieveUpdateDestroyAPIView. This will add another additional method to our endpoint, the DELETE method. Now, making a request to api/v1/characters/<id>/ with the DELETE method will delete the record. You will also see an additional “DELETE” button up at the top of the detail view HTML.

Final Thoughts
Using the generic views provided by the Django Rest Framework, we can see it’s very easy to get some simple CRUD (Create, Retrieve, Update and Delete) views setup once we’ve created our serializer and configured a few URL paths.
Next time we’ll add some complexity to our model and explore how to utilize properties on our models to provide calculated, read-only information to our endpoints.