Managing and Automating Your Composer Packages - Part 2

In the first two parts of this series, we set up a private composer repository, got it up and running on GitHub Pages, and laid the foundation for automatic updates using GitHub Workflows. In this article we’ll set up automation on our package repositories so that they report to the composer repository whenever they’ve been tagged, triggering the docs for that package to update.
The Workflow
Our end goal is to trigger a partial rebuild of the composer repository anytime a new release of one of our packages is created or updated. We could trigger rebuild on a push to any branch or a particular branch, but for the sake of demonstration, we’ll stick to releases in this article.
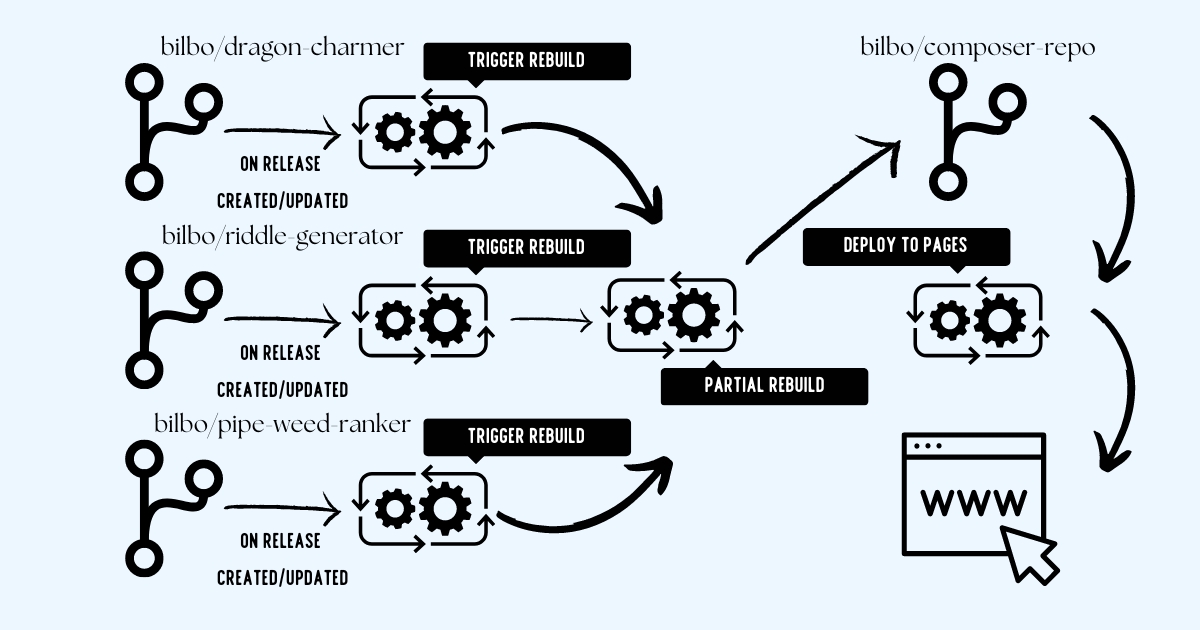 Diagram showing the three primary steps to updates: triggering the partial build of the composer repository, the partial build completing and committing to the main branch and the built-in deployment action for GitHub Pages.
Every partial update will require 3 steps to complete:
- The repository that has an update will send an HTTP request to the composer repository asking it to do a partial rebuild of a particular package.
- The composer repository will execute the partial-build workflow rebuilding the files specific to the package specified and committing the changes to the main branch.
- Because we’re hosting our files from a branch and within a particular directory, GitHub will automatically deploy the newly generated files to GitHub pages.
Personal Access Tokens and Action Secrets
One major problem you will pretty quickly run into with this process is that it’s not possible to trigger a workflow from another repository without a token with appropriate permissions to do so. We’ll manually deal with this problem now but will look at an automated solution toward the end of the article.
Generating a Personal Access Token
Generating personal access tokens (PAT) is very well documented by GitHub within their documentation, but there are a few things to keep in mind when creating one.
If you’re setting up this automation for an organization, you will likely need to agree to a particular set of terms of use that GitHub will prompt you with. This probably isn’t an issue, but you may want to check with your organization’s legal counsel about it before accepting.
Additionally, you may want to consider creating the PAT using a service account that isn’t tied to a particular user to prevent loosing access to the token if the employee leaves.
A good rule of thumb is to create Personal Access Tokens with as few permissions as necessary in order to get the job done. In this case, our token only needs to be able to trigger workflows throughout our user or org.
The PAT will need to have read access to metadata and read and write access to actions and workflows. It does not need the ability to commit code, as the workflows themselves do the actual committing to the repository. This PAT simply causes them to run.
Adding an Action Secret
If you are using GitHub Enterprise, instead of configuring this as a repository secret on individual repositories, you should create an organization secret. The rest of the steps in this guide will work exactly the same, as you can access org secrets in the
secretsvariable within workflows, but you will only have to update the secret in one place instead of on every single repository.If you do not have GitHub Enterprise, no need to worry - we’ll be going over a method to distribute secrets to the repository below.
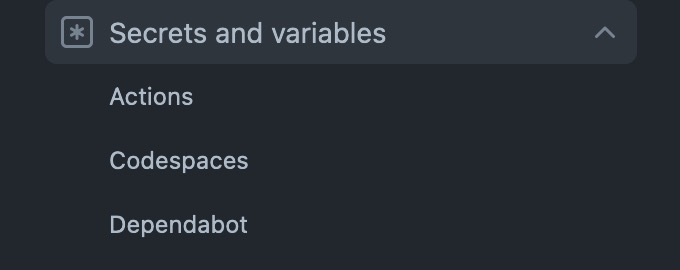
Now that we’ve created our Personal Access Token, we need to add it as an Action Secret so that we can reference it in our workflows. If you go into the Settings page of your repository and open the “Secrets and variables” tab in the left navigation, you’ll see an option for “Actions”.
Within this screen you should see two tabs, each with two lists of variables:
- Secrets
- Environment Secrets
- Repository Secrets
- Variables
- Environment Variables
- Repository Variables
In this case, we want to create a new repository secret, which you can do by clicking the “New repository secret” button. This variable can be named whatever you like, but it’s a good idea to decide on something descriptive and memorable, as you’ll be creating this same variable on every other repository that needs to report updates to the composer repo. for the purposes of our examples below, I’ll call this variable COMPOSER_REPO_PAT. For the value, you’ll copy and paste in the personal access token you created in the step above. Save this and repeat it for any other repositories you want to configure. Once this variable is created on your repositories, we’re ready to create our workflow.
The Notification Workflow
We want to create a workflow that will notify our composer repository whenever a package has been updated so that the repository can do a partial rebuild of just that package. We’ll continue to use our fictional data from prior posts and the diagram above, and set up the workflow for the bilbo/riddle-generator repository.
First, we’ll need to create a workflow file in the repository under .github/workflows and we’ll call this one notify-composer-update.yml. We have a bunch of different options here on when we want to notify the composer repo, so I’ll add a few in the example.
1
2
3
4
5
6
7
8
9
10
11
12
13
14
15
16
17
18
19
20
21
22
23
24
25
name: Notify Composer Update

on:
  push:
    branches:
      - main
      - develop
  release:
    types:
      - published
      - edited
      - deleted
  workflow_dispatch:

jobs:
  build:
    runs-on: ubuntu-latest
    steps:
        run: |
          curl -XPOST \
            -H "Authorization: Bearer $" \
            -H "Accept: application/vnd.github.everest-preview+json" \
            -H "Content-Type: application/json" \
            https://api.github.com/repos/bilbo/composer-repo/actions/workflows/partial-build.yml/dispatches \
            --data '{"ref": "main", "inputs": {"package": "bilbo/riddle-generator"}}'
In this example, we’re going to trigger this workflow when either the main or develop branch is pushed to or whenever a release is created, edited or deleted. The workflow_dispatch trigger also allows us to run the workflow manually from the GitHub GUI at any time. When the workflow is triggered, the API endpoint that triggers a workflow is called containing the personal access token we just created along with a couple of pieces of information in the POST data:
- The branch or “ref” we want the workflow to run against, in this case
main. - The input we created for the
partial-build.ymlworkflow:package. In this case, we send it the package name “bilbo/riddle-generator”.
Commit this to the repository and trigger the workflow manually to test. You should see the notification happen in the “Actions” tab of the repository, and should also see the partial-build action run over in your composer repository.
Automating the Automation
Now that we have the automation set up, there’s one last difficulty to deal with: how do we get a workflow and that PAT out to all of our repositories? Do you have to manually create the secret and workflow file on n number of repositories?
Of course not. In the same way, we can run PHP scripts and commit to repositories via scripts, we can deploy secrets and write files via scripts too.
There are several ways to approach the problem, but for the sake of seeing what’s involved, let’s walk through a simple NodeJS script that does the following:
- Reads the repositories that need to have the secret and workflow file from the
satis.jsonfile in our repo. - Connect out to each repository and make sure the
secretis created and is named correctly, in this case,COMPOSER_REPO_PAT. - Check to make sure the
notify-composer-update.ymlfile exists and contains the appropriate configuration.
Getting set up
We’re going to need to install a few dependencies to run this, so let’s set up a node project using node 16+ and install the following packages:
1
2
npm init -y
npm install --save axios commander dotenv libsodium-wrappers octokit
Axios and commander are completely optional here, but I like using both and I’ll be using them in the example below. Referring back to our list of goals for this script, we’re going to need a few pieces of information, so let’s pull those in as arguments using commander.
It’s important to note that this script requires a token with appropriate permissions on all the repositories that need to be updated. The token passed to the
--tokenparameter will need at the very least read access to the repository metadata (which is required on all PATs anyway) and read/write access to repository secrets.
Deploying the Secret
1
2
3
4
5
6
7
8
9
10
11
12
13
14
15
16
17
18
19
20
21
22
23
24
25
26
27
const { Octokit } = require('octokit');
const axios = require('axios');
const commander = require('commander');
const sodium = require('libsodium-wrappers');

commander
  .version('1.0.0', '-v', '--version')
  .usage('[OPTIONS]...')
  .option('-t, --token <token>', 'The GitHub token to use to connect to the remote repositories', null)
  .option('-p, --composer <url>', 'The URL of the composer repository to scan for a satis.json file', null)
  .option('-k, --key <key>', 'The key to deploy to the repositories.', null)
  .parse(process.argv);

async function main() {
  const options = commander.opts();
  const token = options.token;
  const composerRepoSplit = options.composer.split('.', 2);
  const org = composerRepoSplit[0];
  const repo = composerRepoSplit[1];

  const octokit = new Octokit({
    auth: token,
    headers: {
      'X-GitHub-API-Version': '2022-11-28'
    }
  });
}
Now that we have the org and repo variables of our composer repo set, we can use octokit to get the contents of the satis.json, fetch the file and parse through the repositories.
1
2
3
4
5
6
7
8
9
10
11
12
13
14
15
16
  let satisUrl;

  await octokit.request('GET /repos/{owner}/{repo}/contents/{path}', {
    owner: org,
    repo: repo,
    path: 'satis.json'
  }).then((resp) => {
    satisUrl = resp.data.download_url;
  });

  let repositories;

  await axios.get(satisUrl)
    .then(resp => {
      repositories = resp.data.repositories;
    });
We now have a list of repositories to loop over. On each iteration, we’ll want to set an org and repo variable for each one, and we’ll also need to grab the public key for each repository, which we’ll use to encrypt the Personal Access Token before writing it to the repository.
1
2
3
4
5
6
7
8
9
10
11
12
13
14
15
16
17
18
19
20
21
22
23
24
25
26
27
28
29
30
31
// Add this helper function somewhere outside your
// main function.
/**
 * Parses a git URL in git@ or https:// format
 * and returns the appropriate org/user and repo name.
 * @param {string} url
 * @returns {string}
 **/
function parseRepositoryName(url) {
  if (url.startsWith('git')) {
    return url.split('/', 2)[1];
  } else if (url.startsWith('https')) {
    const parts = url.split('/');
    return parts[parts.length - 2];
  }
}

...

  for (let i = 0; i < repositories.length; i++) {
    const repository = repositories[i];
    const repoName = parseRepositoryName(repository.url);
    const packageName = repository.name;

    const publicKey = await octokit.request('GET /repos/{owner}/{repo}/actions/secrets/public-key', {
      owner: org,
      repo: repoName
    });

    ...
  }
Now we’re ready to encrypt our Personal Access Token and write it to the remote repository. We’ll be adding a helper function to encrypt the key per GitHub’s instructions. This involves casting the public key and secret to byte arrays from base64 and standard string, respectively, encrypting the secret as a byte array, then casting it to base64 and returning the result. This base64 return value is what is written to the repository.
1
2
3
4
5
6
7
8
9
10
11
12
13
14
15
16
17
18
19
20
21
22
23
24
25
26
27
28
29
30
31
32
33
// Add this helper function outside of your main function.

/**
 * Helper function for encrypting an action secret
 * using a repository's public key
 * @param {string} secret The plain text to encrypt
 * @param {string} publicKey The repository public key to use
 * @returns {string}
 */
function encryptSecret(secret, publicKey) {
  let binkey = sodium.from_base64(publicKey, sodium.base64_variants.ORIGINAL);
  let binsec = sodium.from_string(secret);

  let encBytes = sodium.crypto_box_seal(binsec, binkey);
  return sodium.to_base64(encBytes, sodium.base64_variants.ORIGINAL);
}

...
  for (let i = 0; i < repositories.length; i++) {
    ...

    const encryptedKey = encryptKey(key, publicKey.data.key);

    await octokit.request('PUT /repos/{owner}/{repo}/actions/secrets/{secret_name}', {
      owner: org,
      repo: repoName,
      secret_name: 'COMPOSER_REPO_PAT',
      encrypted_value: encryptedKey,
      key_id: publicKey.data.key_id
    });

    ...
  }
And that’s it! At this point, you should be able to run the script and have it deploy the Personal Access Token to the repositories. The command would look something like the following:
1
$ node . --token reallylonggithubtokenstring --composer bilbo/composer-repo --key reallongtokenstringyouwanttodeploy
Deploying Workflow Files
Let’s build on our script and add the ability to deploy and commit a workflow file as well. We’ll need to make sure the PAT we’re using has permission to write to the repository contents, and we’ll need to create a template workflow file to use to deploy to the repositories.
Add a file named workflow-template.yml someplace that’s easily accessible on your system (in this example we’ll assume it’s in the project root directory). Adjust the template as necessary
1
2
3
4
5
6
7
8
9
10
11
12
13
14
15
16
17
18
19
20
21
22
23
24
25
26
name: Notify Composer Update

on:
  push:
    branches:
      - main
      - develop
  release:
    types:
      - published
      - edited
      - deleted
  workflow_dispatch:

jobs:
  build:
    runs-on: ubuntu-latest
    steps:
        run: |
          curl -XPOST \
            -H "Authorization: Bearer $" \
            -H "Accept: application/vnd.github.everest-preview+json" \
            -H "Content-Type: application/json" \
            https://api.github.com/repos/${org}/${repo}/actions/workflows/${workflow_name}/dispatches \
            --data '{"ref": "main", "inputs": {"package": "${package_name}"}}'
This file template should look really familiar, as it’s a templated version of the notify-composer-update.yml we used above. We’ve added a couple of variables that can be set by our script:
- A set of variables related to where the notification needs to go. These are used to build a GitHub API URL that points to the composer repository we’re notifying.
org: The org or user of the composer repository. In our examples,bilbo.repo: The repository name of the composer repository. In our examples,composer-repo.workflow_name: The file name of the workflow we’re triggering. In our example above we named the filenotify-composer-update.yml.
package_name: The name of the package to update. We’ll set this dynamically for each repository as we loop through them.
If you’re adding this to the secret deployment script, we already have the org and repo variables, but we’ll need to get the name of the workflow file for the workflow_name variable. The package_name we can get from the satis.json data we’re already looping over.
Let’s add a -w --workflow-template option to our commander options:
1
2
3
4
5
6
7
8
9
10
11
12
// Add the fs module as we'll need to read the template
// file in.
const fs = require('fs');

commander
  .version('1.0.0', '-v', '--version')
  .usage('[OPTIONS]...')
  .option('-t, --token <token>', 'The GitHub token to use to connect to the remote repositories', null)
  .option('-p, --composer <url>', 'The URL of the composer repository to scan for a satis.json file', null)
  .option('-k, --key <key>', 'The key to deploy to the repositories.', null)
  .option('-w, --workflow <workflow>', 'The path to the workflow file template', null)
  .parse(process.argv);
Then underneath our initial options block, we can go ahead and get the template file.
1
2
3
4
5
6
7
8
9
10
11
12
  const workflowFilePath = options.workflow ?: null;

  let fileTemplate;

  try {
    fileTemplate = workflowFilePath !== null ?
      fs.readFileSync(workflowFilePath, 'utf-8') :
      null;
  } catch (err) {
    console.error(err);
    return;
  }
Now that we have the template, we can process the variables within the template, encode it and write it out to the repository. For simplicity’s sake, we’ll add the logic within the for loop we set up early, after the logic that writes the PAT to the repository secrets.
1
2
3
4
5
6
7
8
9
10
11
12
13
14
15
16
17
...

  for (let i = 0; i < repositories.length; i++) {
    ...

    // This could be accepted as a parameter by adding
    // another option to commander.
    const workflowFileName = 'notify-composer-update.yml';

    const fileContents = fileTemplate
      .replace('${org}', org)
      .replace('${repo}', repo)
      .replace('${workflow_name}', workflowFileName) // This could parameterized
      .replace('${package_name}', packageName);

    const encodedFileContents = Buffer.from(fileContents).toString('base64');
  }
The ensure the file is properly created or updated, we need to try to access the file first before attempting to write it. We’ll use the then...catch functions to handle this. On a successful response (i.e. the file exists and we can get it), the then function will run and we’ll update the file. If it can’t get the file (i.e. it doesn’t exist), we’ll create the file.
1
2
3
4
5
6
7
8
9
10
11
12
13
14
15
16
17
18
19
20
21
22
23
24
25
26
27
28
29
30
31
32
33
34
35
36
  for(...) {
    ...

    await octokit.request('GET /repos/{owner}/{repo}/contents/{path}', {
      owner: org,
      repo: repoName,
      path: `.github/workflows/${workflowFileName}`
    }).then(async (response) => {
      // The file exists. Let's update it!
      await octokit.request('PUT /repos/{owner}/{repo}/contents/{path}', {
        owner: org,
        repo: repoName,
        sha: response.data.sha,
        path: `.github/workflows/${workflowFileName}`,
        message: `Automated update of ${workflowFileName}.`,
        committer: {
          name: 'validname',
          email: 'validemail@gmail.com'
        },
        content: encodedFileContents
      });
    }).catch(async (err) => {
      // The file doesn't exist. Let's create it!
      await octokit.request('PUT /repos/{owner}/{repo}/contents/{path}', {
        owner: org,
        repo: repoName,
        path: `.github/workflows/${workflowFileName}`,
        message: `Automated creation of ${workflowFileName}.`,
        committer: {
          name: 'validname',
          email: 'validemail@gmail.com'
        },
        content: encodedFileContents
      });
    });
  }
Code Cleanup
There are several things that can be made to make this script more generalized or just cleaner and more reusable, but the code above covers the basic details of how to write secrets and workflow files out of the repository.
Some next steps in the process might be automating the generation of the Personal Access Token using a particular service account, and then deploying that token out to the repositories. The recommended max expiration for personal access tokens is 90 days, so being able to quickly redeploy new tokens could be very useful in a production environment.
Final Thoughts
At this point, you should have an internal/private composer repository hosted on GitHub Pages and automatic updates occurring any time a new commit or release is added to those repositories. I think this creates a firm foundation on which to build additional automation tools surrounding releasing and distributing PHP packages for an internal audience. An organization might consider the following points to address in a follow-up sprint:
- Fully automating the updates to Personal Access Tokens (or upgrading to GitHub Enterprise so this isn’t needed).
- Working with different build triggers for the
notify-composer-update.ymlworkflow that more closely aligns with your team’s workflow. - Automating updates of projects that consume your composer repository. This can especially be useful in scenarios where you want commit updates (say to a DEV or QA style branch) to automatically trigger a
composer updateon a project and trigger a deployment. We may end up covering this topic in a future post.
Starting next week, I’ll begin a regular schedule of posting once per week, switching between a technical post - like this series - and a more general post on tech news and current topics of discussion. See you then!