Managing and Automating Your Composer Packages - Part 1

A core goal of any DevOps configuration is to minimize the time spent on repetitive, predictable and easily performed tasks through automation. In our article on Creating a Private Composer Repository on GitHub, we set up a composer repository using Satis and set up hosting using GitHub pages. In this article, we’ll go over how to add, update and archive packages from the repository, and then automate some of those tasks using GitHub Workflows.
Managing the Repository using Satis
The Satis package provides us with several commands for managing the packages within our repository. To understand what these commands ultimately do, we need to review what’s included in the satis.json file, which is the primary configuration file for the package repository.
In order to go through the example below, we’ll need a fictional scenario we can work through. We’ll borrow Mr. Baggins’ name again and assume we have 3 composer ready PHP repositories ready to go on GitHub.
Username: bilbo
Repositories
- bilbo/shire-pipe-weed-ranker
- bilbo/dragon-charmer
- bilbo/riddle-generator
If you’re following along with the article, be sure to replace the values in the examples with actual repositories as most of the Satis commands will fail if the repositories in the configuration aren’t valid repositories with composer files.
Understanding the satis.json File
The satis.json file acts as the primary configuration file for the composer repository. If you followed along with the previous post, your file should look something like the following:
1
2
3
4
5
6
7
{
    "name": "bilbo/composer-repo",
    "homepage": "https://bilbo.github.io/composer-repo",
    "repositories": [],
    "output-dir": "docs/",
    "require-all": true
}
We’ll be adding some entries to the repositories array. At a very minimum, each repository needs a “type” and “url” value, but it can be very helpful to go ahead and set the “name” property. So, to add Bilbo’s “riddle-generator” repository, we would add the following:
1
2
3
4
5
6
7
8
9
10
11
12
13
{
    "name": "bilbo/composer-repo",
    "homepage": "https://bilbo.github.io/composer-repo",
    "repositories": [
      {
        "name": "bilbo/riddle-generator",
        "type": "vcs",
        "url": "https://github.com/bilbo/riddle-generator/"
      }
    ],
    "output-dir": "docs/",
    "require-all": true
}
It’s important to note that the “name” property determines what package name must be used for anyone consuming your package. If this is not set, the package name provided in the repository’s composer.json file will be used when the repository is generated. However, if the name is set in the satis.json file, the name configured there will be preferred over whatever the package name in the remote repository is.
We could go ahead and add Bilbo’s other 2 repositories, but let’s take a look at using Satis’s built-in command for adding packages, as we’ll leverage this later for automation purposes.
Adding a New Package
Satis provides a command for adding packages: satis add [options] [--] <url> [<file>]. For our purposes, we’ll only need to provide a single option and the URL of the repositories:
1
2
$ php bin/satis add https://github.com/bilbo/shire-pipeweed-ranker/ --name=bilbo/shire-pipeweed-ranker
$ php bin/satis add https://github.com/bilbo/dragon-charmer/ --name=bilbo/dragon-charmer
After running each add command, you should see the entries added to the satis.json file. You’ll end up with a file looking something like this:
1
2
3
4
5
6
7
8
9
10
11
12
13
14
15
16
17
18
19
20
21
22
23
{
    "name": "bilbo/composer-repo",
    "homepage": "https://bilbo.github.io/composer-repo",
    "repositories": [
      {
        "name": "bilbo/riddle-generator",
        "type": "vcs",
        "url": "https://github.com/bilbo/riddle-generator/"
      },
      {
        "name": "bilbo/shire-pipeweed-ranker",
        "type": "vcs",
        "url": "https://github.com/bilbo/shire-pipeweed-ranker/"
      },
      {
        "name": "bilbo/dragon-charmer",
        "type": "vcs",
        "url": "https://github.com/bilbo/dragon-charmer/"
      }
    ],
    "output-dir": "docs/",
    "require-all": true
}
Each command should also prompt Satis to regenerate the site files, add new JSON files for each package, as well as updating the all.json file. If you’ve pointed to active projects, you should see tags for every branch and tag that has a composer file present in the available versions for each package.
Updating All Packages
So, the repository is set up and all the current branches and versions show up in the package list. What do we do when a new branch or tag is created on one of the projects? That’s where the build command comes into play. By default, the build command will rebuild the entire repository. This means it needs to go out to every repository listed in your satis.json’s “repository” array, search through all the branches and tags to see if there’s a composer file present, and then add that branch or tag to the available versions of the package.
The
buildcommand can be an expensive operation, taking quite a long time to run depending on the number of repositories you have configured in yoursatis.jsonfile. In addition, you’ll eventually end up hitting GitHub’s API rate limit if Satis has to make too many requests.I’d recommend not running this command very often unless there is a particularly good reason to completely rebuild the entire repository. Instead try the rebuilding a single package step described below.
To rebuild the entire repository, you can use the following command:
1
2
3
$ php bin/satis build
# Or if you want to be verbose
$ php bin/satis build satis.json docs/
The command takes three positional arguments, but only the first two are relevant right now. In the verbose example above, the satis configuration file is provided as the first argument (satis.json) and the output directory as the second (docs/). The default configuration file path is satis.json so this can usually be omitted in most cases. In addition, if you’ve configured the output-dir property in your satis.json you can also omit that argument as well. However, since the arguments are positional, if you need to provide the output directory argument, you must provide the configuration file argument first.
Updating a Single Package
The build command also provides a third positional argument: packages. When this argument is omitted - like in the examples above - the entire repository will be rebuilt. However, one or more packages can be provided in this argument and the process will only update those repositories. So, for example, if a new tag had been added to Bilbo’s dragon-charmer repository, we could update it using the following command:
1
$ php bin/satis build satis.json docs/ bilbo/dragon-charmer
Note that the
fileandoutput-dirarguments were both provided even though it’s possible for us to run the full rebuild command without providing those. This is because when working with positional arguments, you must provide the arguments in order. So in order to add the<packages>argument we must add thefileandoutput-dirarguments.
We can also update multiple packages at once. Let’s go ahead and update Bilbo’s other two packages at the same time.
1
$ php bin/satis build satis.json docs/ bilbo/shire-pipeweed-ranker bilbo/riddle-generator
After running each of these commands, we should see regenerated JSON files for each package along with updates to the all.json file. When a composer process points to your repository for package information, it’s these JSON files that it’s processing to get the package information. So, it’s important to check that these are getting updated when you run these commands, as no changes to them would indicate something went wrong with the update process. Since we’re tracking our repository in a git repo, it’s easy to see these changes by simply running a git diff after the build command.
Creating GitHub Workflows
Now that we have a good understanding of how to programmatically update the composer repository using the built-in Satis command, we can leverage that knowledge to automate some of these processes with GitHub workflows. We’ll be using the commands described above to make the additions and updates, but having a workflow do the actual work and commit the results back to the repository.
If you’re new to GitHub workflows, GitHub’s documentation is a pretty good place to get oriented. But to provide my description in brief, GitHub Workflows are a set of actions, configured via a YAML file that’s committed into the repository, that will spin up a small environment and execute a series of actions based on the configuration. The examples below will all be using prepared actions, so fully understanding how this works isn’t really necessary. You just need to understand that an action is a step within your workflow that can be configured using parameters, that will set up an execution environment, execute the action, and then tear down the environment.
We will be using three actions in our private composer repository:
To add a new workflow, you’ll want to create a directory within your composer repository named .github/workflows/. In this directory, you’ll add YAML files for each workflow you want to use. For example, for adding packages you might add an add-package.yml. You’ll name the workflow within the file itself, so the file name is mostly for your reference as a developer to be able to quickly locate a workflow.
New Package Workflow
Add a file to the .github/workflows directory named add-package.yml and copy and paste the following into the file:
1
2
3
4
5
6
7
8
9
10
11
12
13
14
15
16
17
18
19
20
21
22
23
24
25
26
27
28
29
30
31
name: Add Package
on:
  workflow_dispatch:
    inputs:
      package_url:
        type: string
        description: Package URL
      package_name:
        type: string
        description: Package Name

jobs:
  build:
    runs-on: ubuntu-latest
    steps:
      - uses: actions/checkout@v2
      - uses: jmbarne3/satis-add-package@v1
        with:
          token: $ # App/OAuth token, PAT
          package_url: $
          package_name: $
      - env:
          GIT_EMAIL: somevalidemail@gmail.com
          GIT_NAME: somevalidname
        run: |
          git config user.name $GIT_NAME
          git config user.email $GIT_EMAIL
          git add docs/
          git add satis.json
          git commit -m "Added $ to repository."
          git push
Let’s walk through the various sections of the YAML file and talk about what’s going on. The “name” property provides a friendly name for GitHub. Whenever a workflow runs, this is how it will be identified in the GUI.
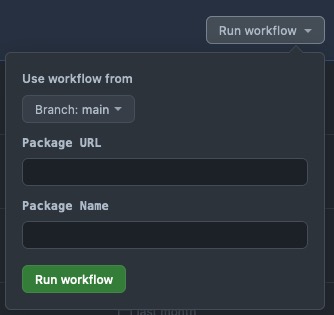
The on property configures when and how this workflow gets triggered. All kinds of triggers can be used to kick off a workflow, but in this case, we’re going to use workflow_dispatch, which is a fancy way of saying “when I manually kick off the workflow”. Specifically, GitHub will add a “Run Workflow” button to the GUI along with the inputs that are provided directly underneath the workflow_dispatch trigger type. In addition, the workflow can be triggered via the GitHub API along with the inputs provided from another repository or an automated process.
In this example, we have two inputs: package_url and package_name. These two inputs are provided to the jmbarne3/satis-add-package@v1 action as parameters. Ultimately, that action ends up running the following command: php bin/satis add ${package_url} --name${package_name} - which should look familiar!
The next block of the configuration runs the actions themselves:
1
2
3
4
5
6
7
8
9
10
11
12
13
14
15
16
17
18
19
20
jobs:
  build:
    runs-on: ubuntu-latest
    steps:
      - uses: actions/checkout@v2
      - uses: jmbarne3/satis-add-package@v1
        with:
          token: $ # App/OAuth token, PAT
          package_url: $
          package_name: $
      - env:
          GIT_EMAIL: somevalidemail@gmail.com
          GIT_NAME: somevalidname
        run: |
          git config user.name $GIT_NAME
          git config user.email $GIT_EMAIL
          git add docs/
          git add satis.json
          git commit -m "Added $ to repository."
          git push
A single job named “build” running on “ubuntu-latest” will run a couple of steps. The “steps” block represents a series of steps that run for the job. The first two lines define the pre-built actions that we want to run. You can call these pre-built actions using the “uses” property. The first actions/checkout@v2 ensures that our repository - the repository this workflow is running on - is checked out. This makes sure we’re running against the current code of whichever branch this workflow is running against.
The next step is an action that runs the satis add command. Because we need to provide a URL and name for our package - these two inputs are required by the action - we pass them in using the inputs variable. In addition, the action requires a token parameter. The variable $ is updated automatically depending on the context of how the workflow was triggered. If, for example, the workflow was triggered through the GitHub API, the token would be provided in the API request.
The next line sets some environment variables for us so we can use them in the environment we’ll be executing our run command on. Specifically, we want to set the user.name and user.email configurations on the environment so that when we commit our changes, they appear to have been committed by a particular user.
In my use of this workflow, I specifically set these to a service account we have for our organization. All automated commits created by workflows show up as the service user, immediately indicating to developers that it was an automated commit.
Finally, the run step allows us to run shell commands on the build environment. We use this to add the changes to the repository, commit them along with a formatted message and then push them to the repository.
Once you’ve created the add-package.yml file, you can push it up to GitHub and should see the action available under the “Actions” tab. If you click on the “Add Package” action - or whatever you named it - you should see the “Run Workflow” toggle. Click on this, provide the input parameters, and click the “Run Workflow” button and enjoy the magic!
All Package Rebuild Workflow
Next, we want to add a workflow that allows the entire repository to be built/rebuilt. Create a new workflow at .github/workflows/full-build.yml and paste in the following configuration:
1
2
3
4
5
6
7
8
9
10
11
12
13
14
15
16
17
18
19
20
21
22
name: Full Composer Rebuild

on:
  - workflow_dispatch

jobs:
  build:
    runs-on: ubuntu-latest
    steps:
      - uses: actions/checkout@v2
      - uses: dev-this/satis-build@v1
        with:
          token: $ # App/OAuth token, PAT
      - env:
          GIT_EMAIL: somevalidemail@gmail.com
          GIT_NAME: somevalidname
        run: |
          git config user.name $GIT_NAME
          git config user.email $GIT_EMAIL
          git add docs/
          git commit -m "Re-built repository assets"
          git push
This workflow is very similar to the Add Package workflow but much more simple. Since we’re rebuilding the entire repository, there is no need for any input. It is also triggered on workflow_dispatch, meaning it can only be triggered via the GUI or the GitHub API.
We’re using the dev-this/satis-build@v1 package in this workflow, which is the action I based both the satis-add-package and satis-partial-build actions on. Outside of that difference, note that the run step doesn’t specifically add the satis.json file like the previous workflow, because this file shouldn’t be changing in this workflow, only the HTML and JSON files within the docs/ directory.
Single Package Rebuild Workflow
The single package workflow is also fairly simple but is going to be a powerful tool moving forward. To get started, create a new workflow file at .github/workflows/partial-build.yml and paste in the following:
1
2
3
4
5
6
7
8
9
10
11
12
13
14
15
16
17
18
19
20
21
22
23
24
25
26
27
28
name: Partial Composer Rebuild

on:
  workflow_dispatch:
    inputs:
      package:
        type: string
        description: Package name

jobs:
  build:
    runs-on: ubuntu-latest
    steps:
      - uses: actions/checkout@v2
      - uses: jmbarne3/satis-partial-build@v1
        with:
          token: $ # App/OAuth token, PAT
          package: $
      - env:
          GIT_EMAIL: somevalidemail@gmail.com
          GIT_NAME: somevalidname
        run: |
          git config user.name $GIT_NAME
          git config user.email $GIT_EMAIL
          git add docs/
          git commit -m "Re-built repository assets for $"
          git push
We have one input for this workflow, package which represents the package name. The steps should look familiar at this point:
- Checkout the code
- Run the partial rebuild with the provided GitHub token and the package name passed as inputs
- Setup the environment variables for the commit
- Commit the code back to the repository
Using Your Repository
Now that we have a working composer repository, we’ll want to use it in one of our projects. Set up a new project that will use composer to install the packages and initialize your composer file through whatever means you usually do. To tell composer to look in your repository for packages, you’ll need to add it to the repository list and add the packages into your require or require-dev properties, as needed.
1
2
3
4
5
6
7
8
9
10
11
12
13
14
15
16
17
18
19
{
  "name": "bilbo/there-and-back-again",
  "description": "A hobbit's holiday",
  "require": {
    "bilbo/dragon-charmer": "*",
    "bilbo/riddle-generator": "*"
  },
  "repositories": [
    {
      "type": "composer",
      "url": "https://bilbo.github.io/composer-repo/"
    }
  ],
  "config": {
    "allow-plugins": {
      "composer/installers": true
    }
  }
}
Provided everything is set up correctly within your package repositories, you should now be able to run composer update and see your packages install in the default /vendor path.
Final Thoughts
At this point, you should have a fully functional composer repository hosted on GitHub. You can add and update packages using GitHub actions. In the next article, we’ll look at triggering these workflows remotely or from other GitHub repositories. Our goal will be to trigger a partial rebuild of a specific package whenever a new release is created on that package.